Blog

Logging to the Windows Eventlog using Powershell

When automating tasks, such as software installation, using Powershell, it is useful to output to a logfile for fault finding purposes, but I have never liked the idea of creating log files, as these are not easily managed and can build up over time. Another problem is that no-one, other than yourself, is likely to know that the logs exist, or where it is located. Everyone, however, knows about the Windows Eventlog and how to access it, so it makes sense to log your information there.

Adding script output to the Windows Eventlog is reasonably straightforward, but has to be done in the correct way. To use the Eventlog you need to create two items, a new Eventlog and a Source for the log entries. Optionally you can then configure the log that you have created. The code for this is below.

New-EventLog -LogName Application -Source "Documentum_Webtop-AddIn_1.0_x86_R01"
Limit-EventLog -OverflowAction OverWriteAsNeeded -MaximumSize 64KB -LogName Application

The first line of code creates a log called Application, with a source called Documentum_Webtop-AddIn_1.0_x86_R01. The source is simply the packaged application that I am going to be installing. Using this name makes it easy to identify log entries from the application within the Eventlog.

The second line of code sets the maximum size of the log to 64Kb and configures the log to overwrite when it gets to the maximum size.

I can now write to the Eventlog by using the following command.

Write-EventLog -LogName "Application" -Source "Documentum_Webtop-AddIn_1.0_x86_R01" -EventID 25001  -EntryType Information -Message "Begining install of Application Documentum_Webtop-AddIn_1.0_x86_R01"

The EventID should be 25000 or greater, as this range is undocumented.

ErrorType can be Information, Warning or Error.

When writing install and uninstall scripts, I like to include the New-Eventlog and Limit-EventLog entries at the beginning of the Install script, and then remove the Source at the end of the Uninstall script. This keeps things tidy, especially if you have a large number of applications to install.

To remove the source use the following command.

Remove-EventLog -Source "Documentum_Webtop-AddIn_1.0_x86_R01"

Deploying Objects in Azure using ARM Templates

Object creation in Azure can be automated in many ways, one of which is by using ARM Templates. ARM Templates can either be authored from scratch, or can be based on manually deployed objects or Resource Groups.

In this post I simply want to detail the commands to use to deploy ARM Templates whether they are located locally, or in GitHub.

Start by connecting your Powershell session to Azure, using the command below (ensure that you have installed the Azure Powershell module previously).

Connect-AzAccount

This will prompt you for your Azure credentials and give you access to create objects in your Azure subscription.

Deploy Local ARM Templates

The command to deploy ARM templates that are stored locally is as follows.

New-AzResourceGroupDeployment -Name DeploymentName -ResourceGroupName <NameofResourceGroup> -TemplateFile "C:\DefaultVNETandNSG.json" -TemplateParameterFile "C:\DefaultVNETandNSG.parameters.json"

-Name is the name you wish to give this deployment.

-ResourceGroupName is the name of the Resource Group the objects will be created in.

-TemplateFile is the path to the template file you are using.

-TemplateParameterFile is the path to the parameter file that you are using (if any).

Deploying Templates stored in GitHub

The command to deploy templates store in GitHub is only slightly different.

New-AzResourceGroupDeployment -Name TestDeployment -ResourceGroupName <NameofResourceGroup> -TemplateUri "https://raw.githubusercontent.com/<NameofRepository>/Templates/master/DefaultVNETandNSG.json" -TemplateParameterUri "https://raw.githubusercontent.com/<NameofRepository>/Templates/master/DefaultVNETandNSG.parameters.json"

Only the following switches are different with this command.

-TemplateUri is the RAW URL for the template file.

-TemplateParameterUri is the RAW URL for the parameter file (if used).

*** Remember to only use the RAW URL for the paths for both files. Otherwise the deployment will fail. ***

Change the MFA Default Verification Method for a User in AAD

I recently had a user who had been required to configure MFA for their account. They had had problems with using the Microsoft Authenticator application and had ended up configuring their mobile phone number as the verification method. The user wanted to have another go at setting up MFA using the Microsoft Authenticator application but didn’t know how.

As its something that doesn’t get done very often I thought it would be useful to document the process.

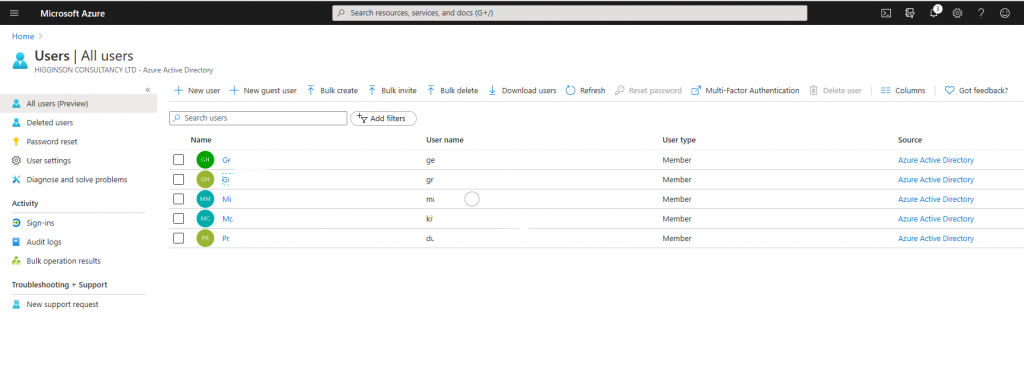
Firstly, the user will need to authenticate to Azure, by going to https://azure.portal.com. Type Users into the search field and select Users in the returned list.

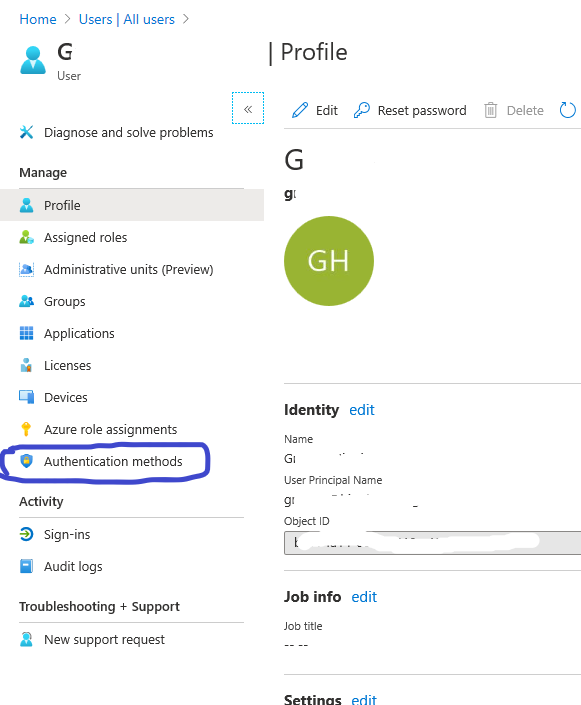
Select your user and then select Authentication Methods from the left hand menu.

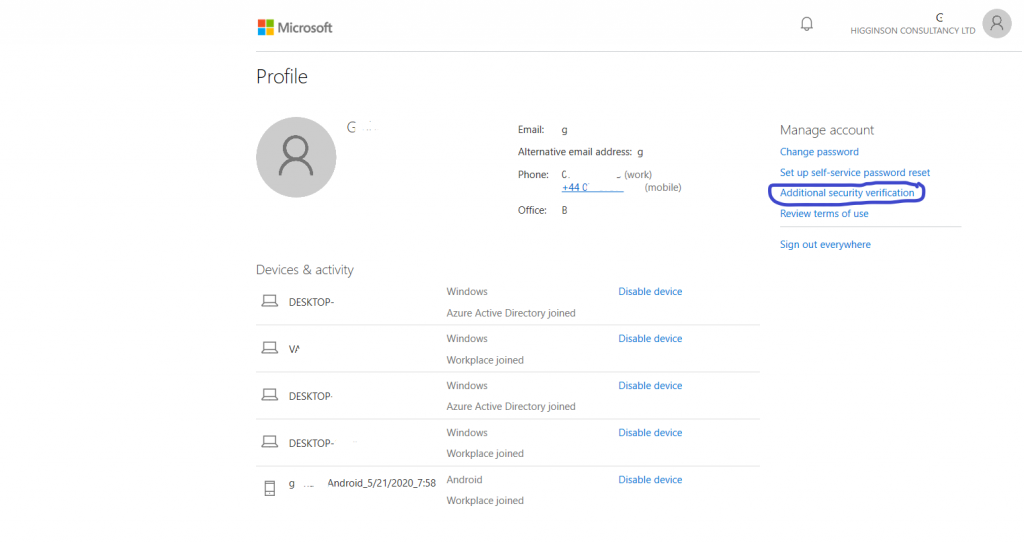
When the profile page for the user is displayed, select Additional security verification on the right hand side of the screen.

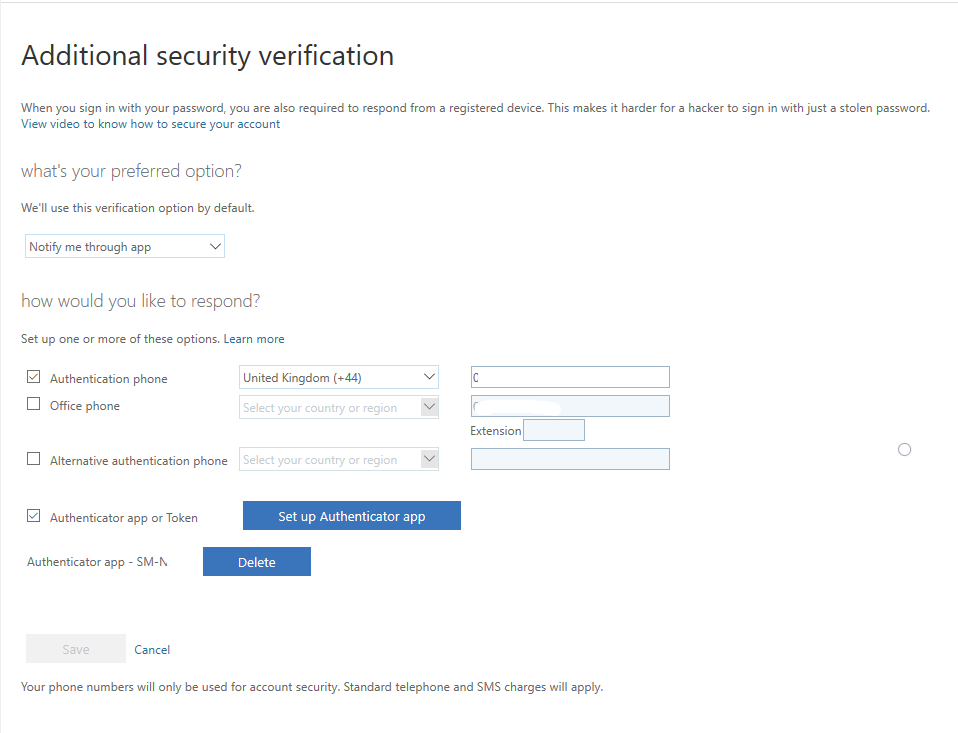
You will now be taken to the Additional Security Verification page. Here you can change your MFA settings and default contact method.

Adding existing devices to Autopilot using Powershell

Adding devices to Autopilot requires gathering the hardware ID hash of the device. If you are buying new devices from a supplier they can usually provide the details in a file that can be imported into Autopilot.

If you have existing machines that you want to enable for Autopilot deployment, Microsoft have provided a script that will gather the correct information and create a CSV file that can be imported into Autopilot.

md c:\\HWID
Set-Location c:\\HWID
Set-ExecutionPolicy -Scope Process -ExecutionPolicy Unrestricted
Install-Script -Name Get-WindowsAutoPilotInfo
Get-WindowsAutoPilotInfo.ps1 -OutputFile AutoPilotHWID.csv

The above script will need to be run on each device that needs to be added to Autopilot.

Are your Application Packaging Standards costing you money? : 5 mistakes often seen in packaging standards documents

Application Packaging Standards are used by organisations to specify how their desktop applications will be repackaged for deployment to desktop and laptop devices.

This makes good sense as it provides standards that should be met for all applications, to reduce errors and ensure that deployments work in all required scenarios. These standards are of particular benefit when bring in external resources for things like desktop transformations, when the new people may have a different idea of what standards to use.

Unfortunately, Packaging Standards often get set in stone and remain unchanged for many years. Being technical documents, the are usually created by one or two, very technical, people, who may have left the organisation since they were written. The application packaging environment has moved on a lot since the early days, but it is amazing how often I come across documents that have not been updated for many years, and are still specifying out of date requirements. These aged requirements are probably adding to the cost of each application that gets packaged. As many organisations can have between 300 and 1000 applications, this can add up to a very substantial outlay, for no good business reason.

Below are some of the mistakes I come across frequently.

1. Specifying that all applications should be repackaged as MSI

This requirement is very outdated. In the early days of application packaging, many installers did not support command line installation. That is very rare these days. Why go to the trouble of repackaging to an MSI when the vendor’s installer may install silently simply by adding /s to the command line? Also, the moment an application is repackaged you will get no support from the majority of software vendors. Using the vendors automation means that vendor support will be maintained.

There are times when repackaging as MSI makes sense. Some application vendors write very poor installation routines and it can sometimes be impossible to automate the install without user intervention. These situation, though, should be rare. Ninety percent, or more, of applications can be successfully installed using the vendors inbuilt automation. Repackaging costs time and money.

2. Very prescriptive and complicated standards

This is often related to mistake 1. Repackaging an application to an MSI allows all sorts of customisation to the installer. Often, though, I struggle to see a valid business reason behind the requirement.

Is there really a proper business need for putting the application shortcuts in a different location from that specified by the vendor? Is removing ALL ICE Errors and Warnings really going to make your package more robust (considering the number of errors and warnings that Microsoft leaves in its products)? Are all those extra Properties really required? Do you really need to remove all those files from an App-V sequence?

Standards are important, but there must be a valid reason for them. otherwise they are simply adding to the packaging costs and keeping application packagers in a job. Remember that you are happy to accept the vendors manual installation, including all the extra files and registry entries that it adds, so why make major changes when automating that installation?

3. Specify a single application packaging type

There are many different packaging types out there these days. MSI, EXE, MSIX, App-V, App-X, ThinApp etc. The moment that you specify a single packaging type you are going to end up spending a lot of time trying to get some of your square applications into the round packaging type hole.

Far better to use the correct packaging type for the job, and support many packaging types. You can have preferred options, for example App-V or MSIX, but don’t expect these to work for all applications.

I always specify multiple applications types, with a default starting point. For example you might have a default package type of App-V, but limit the amount of time spent making this work. Have a fallback position of “vendor supported”, which will be used if your application doesn’t work with the default packaging type.

4. Not including deployment in your Application Packaging Standards

Deployment of a packaged application is the other side of the packaging coin. To not cover it in the packaging standards removes options from the packagers toolkit. Things like application upgrades would normally be handled by the deployment tool/s you normally use.

A deployment test should be performed by the packager who packaged the application so that they can ensure that the package installs correctly.

5. Manual processes not automated

Many packaging processes relay on manual tasks, for example manually creating Applications, Collections, deployments etc in SCCM. It is very straightforward to automate this and both speed up the process and ensure that naming conventions etc are implemented properly.

If you save 15 or 20 minutes per application, that can mean a large time saving on packaging and deploying 300 applications. An identifiable and specific cost saving. But there can be cost savings from ensuring that things like SCCM collections and media deployments are done correctly by using automation. So many times I visit a site and see multiple naming conventions and ways things have been implemented that do not meet the required standards, and automation helps to ensure those standards are always met.

Automation can be implemented a bit at a time, to make implementation easier. People often say that it costs too much time to develop, but I have always seen overall cost savings, for the modest amount of upfront effort and cost.

Use of the automation should be described in your Packaging Standards.

Copying or migrating users between groups

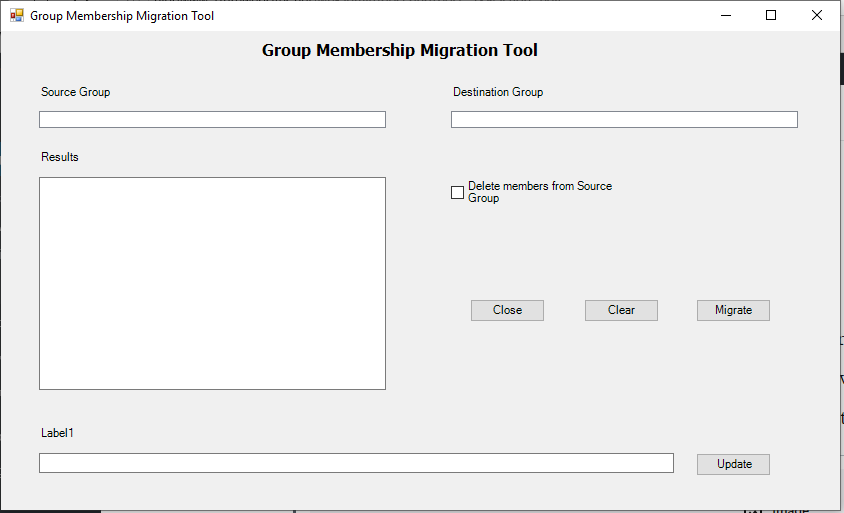
A common task when implementing new systems is to copy or migrate users from one AD group to another. It’s often a requirement when deploying upgraded application versions too. I wrote a small utility that makes this task easier. Being GUI based means it can be used by less technical team members as well.

The PowerShell code for this utility is below.

#region ScriptForm Designer

#region Constructor

[void][System.Reflection.Assembly]::LoadWithPartialName("System.Windows.Forms")
[void][System.Reflection.Assembly]::LoadWithPartialName("System.Drawing")

#endregion

#region Post-Constructor Custom Code

#endregion

#region Form Creation
#Warning: It is recommended that changes inside this region be handled using the ScriptForm Designer.
#When working with the ScriptForm designer this region and any changes within may be overwritten.
#~~< GroupMembershipMigrationToolForm >~~~~~~~~~~~~~~~~~~~~~~~~~~~~~~~~~~~~~~~~~~
$GroupMembershipMigrationToolForm = New-Object System.Windows.Forms.Form
$GroupMembershipMigrationToolForm.ClientSize = New-Object System.Drawing.Size(839, 479)
$GroupMembershipMigrationToolForm.Text = "Group Membership Migration Tool"
#~~< UpdateButton >~~~~~~~~~~~~~~~~~~~~~~~~~~~~~~~~~~~~~~~~~~~~~~~~~~~~~~~~~~~~~~
$UpdateButton = New-Object System.Windows.Forms.Button
$UpdateButton.Location = New-Object System.Drawing.Point(695, 422)
$UpdateButton.Size = New-Object System.Drawing.Size(75, 23)
$UpdateButton.TabIndex = 13
$UpdateButton.Text = "Update"
$UpdateButton.UseVisualStyleBackColor = $true
#~~< TextBox2 >~~~~~~~~~~~~~~~~~~~~~~~~~~~~~~~~~~~~~~~~~~~~~~~~~~~~~~~~~~~~~~~~~~
$TextBox2 = New-Object System.Windows.Forms.TextBox
$TextBox2.Location = New-Object System.Drawing.Point(38, 422)
$TextBox2.Size = New-Object System.Drawing.Size(635, 20)
$TextBox2.TabIndex = 12
$TextBox2.Text = ""
#~~< Label1 >~~~~~~~~~~~~~~~~~~~~~~~~~~~~~~~~~~~~~~~~~~~~~~~~~~~~~~~~~~~~~~~~~~~~
$Label1 = New-Object System.Windows.Forms.Label
$Label1.Location = New-Object System.Drawing.Point(38, 395)
$Label1.Size = New-Object System.Drawing.Size(100, 23)
$Label1.TabIndex = 11
$Label1.Text = "Label1"
$Label1.add_MouseClick({UpdateButtonMouseClick($Label1)})
#~~< MigrateButton >~~~~~~~~~~~~~~~~~~~~~~~~~~~~~~~~~~~~~~~~~~~~~~~~~~~~~~~~~~~~~
$MigrateButton = New-Object System.Windows.Forms.Button
$MigrateButton.Location = New-Object System.Drawing.Point(695, 268)
$MigrateButton.Size = New-Object System.Drawing.Size(75, 23)
$MigrateButton.TabIndex = 10
$MigrateButton.Text = "Migrate"
$MigrateButton.UseVisualStyleBackColor = $true
$MigrateButton.add_MouseClick({MigrateButtonMouseClick($MigrateButton)})
#~~< ClearButton >~~~~~~~~~~~~~~~~~~~~~~~~~~~~~~~~~~~~~~~~~~~~~~~~~~~~~~~~~~~~~~~
$ClearButton = New-Object System.Windows.Forms.Button
$ClearButton.Location = New-Object System.Drawing.Point(583, 268)
$ClearButton.Size = New-Object System.Drawing.Size(75, 23)
$ClearButton.TabIndex = 9
$ClearButton.Text = "Clear"
$ClearButton.UseVisualStyleBackColor = $true
$ClearButton.add_MouseClick({ClearButtonMouseClick($ClearButton)})
#~~< CloseButton1 >~~~~~~~~~~~~~~~~~~~~~~~~~~~~~~~~~~~~~~~~~~~~~~~~~~~~~~~~~~~~~~
$CloseButton1 = New-Object System.Windows.Forms.Button
$CloseButton1.Location = New-Object System.Drawing.Point(469, 268)
$CloseButton1.Size = New-Object System.Drawing.Size(75, 23)
$CloseButton1.TabIndex = 8
$CloseButton1.Text = "Close"
$CloseButton1.UseVisualStyleBackColor = $true
$CloseButton1.add_MouseClick({CloseButton1MouseClick($CloseButton1)})
#~~< ResultsLabel >~~~~~~~~~~~~~~~~~~~~~~~~~~~~~~~~~~~~~~~~~~~~~~~~~~~~~~~~~~~~~~
$ResultsLabel = New-Object System.Windows.Forms.Label
$ResultsLabel.Location = New-Object System.Drawing.Point(38, 119)
$ResultsLabel.Size = New-Object System.Drawing.Size(100, 15)
$ResultsLabel.TabIndex = 7
$ResultsLabel.Text = "Results"
$ResultsLabel.add_Click({Label1Click($ResultsLabel)})
#~~< TextBox1 >~~~~~~~~~~~~~~~~~~~~~~~~~~~~~~~~~~~~~~~~~~~~~~~~~~~~~~~~~~~~~~~~~~
$TextBox1 = New-Object System.Windows.Forms.TextBox
$TextBox1.Location = New-Object System.Drawing.Point(38, 146)
$TextBox1.Multiline = $true
$TextBox1.Size = New-Object System.Drawing.Size(347, 213)
$TextBox1.TabIndex = 6
$TextBox1.Text = ""
#~~< DeleteMembersCheckBox >~~~~~~~~~~~~~~~~~~~~~~~~~~~~~~~~~~~~~~~~~~~~~~~~~~~~~
$DeleteMembersCheckBox = New-Object System.Windows.Forms.CheckBox
$DeleteMembersCheckBox.Location = New-Object System.Drawing.Point(450, 146)
$DeleteMembersCheckBox.Size = New-Object System.Drawing.Size(198, 33)
$DeleteMembersCheckBox.TabIndex = 5
$DeleteMembersCheckBox.Text = "Delete members from Source Group"
$DeleteMembersCheckBox.UseVisualStyleBackColor = $true
#~~< GroupMembershipMigrationToolLabel >~~~~~~~~~~~~~~~~~~~~~~~~~~~~~~~~~~~~~~~~~
$GroupMembershipMigrationToolLabel = New-Object System.Windows.Forms.Label
$GroupMembershipMigrationToolLabel.Font = New-Object System.Drawing.Font("Tahoma", 12.0, [System.Drawing.FontStyle]::Bold, [System.Drawing.GraphicsUnit]::Point, ([System.Byte](0)))
$GroupMembershipMigrationToolLabel.Location = New-Object System.Drawing.Point(258, 9)
$GroupMembershipMigrationToolLabel.Size = New-Object System.Drawing.Size(333, 23)
$GroupMembershipMigrationToolLabel.TabIndex = 4
$GroupMembershipMigrationToolLabel.Text = "Group Membership Migration Tool"
#~~< DestinationGroupLabel >~~~~~~~~~~~~~~~~~~~~~~~~~~~~~~~~~~~~~~~~~~~~~~~~~~~~~
$DestinationGroupLabel = New-Object System.Windows.Forms.Label
$DestinationGroupLabel.Location = New-Object System.Drawing.Point(450, 54)
$DestinationGroupLabel.Size = New-Object System.Drawing.Size(141, 23)
$DestinationGroupLabel.TabIndex = 3
$DestinationGroupLabel.Text = "Destination Group"
$DestinationGroupLabel.add_Click({Label2Click($DestinationGroupLabel)})
#~~< SourceGroupLabel >~~~~~~~~~~~~~~~~~~~~~~~~~~~~~~~~~~~~~~~~~~~~~~~~~~~~~~~~~~
$SourceGroupLabel = New-Object System.Windows.Forms.Label
$SourceGroupLabel.Location = New-Object System.Drawing.Point(38, 54)
$SourceGroupLabel.Size = New-Object System.Drawing.Size(141, 23)
$SourceGroupLabel.TabIndex = 2
$SourceGroupLabel.Text = "Source Group"
#~~< ListBox2 >~~~~~~~~~~~~~~~~~~~~~~~~~~~~~~~~~~~~~~~~~~~~~~~~~~~~~~~~~~~~~~~~~~
$ListBox2 = New-Object System.Windows.Forms.ListBox
$ListBox2.FormattingEnabled = $true
$ListBox2.Location = New-Object System.Drawing.Point(450, 80)
$ListBox2.SelectedIndex = -1
$ListBox2.Size = New-Object System.Drawing.Size(347, 17)
$ListBox2.TabIndex = 1
#~~< ListBox1 >~~~~~~~~~~~~~~~~~~~~~~~~~~~~~~~~~~~~~~~~~~~~~~~~~~~~~~~~~~~~~~~~~~
$ListBox1 = New-Object System.Windows.Forms.ListBox
$ListBox1.FormattingEnabled = $true
$ListBox1.Location = New-Object System.Drawing.Point(38, 80)
$ListBox1.SelectedIndex = -1
$ListBox1.Size = New-Object System.Drawing.Size(347, 17)
$ListBox1.TabIndex = 0
$GroupMembershipMigrationToolForm.Controls.Add($UpdateButton)
$GroupMembershipMigrationToolForm.Controls.Add($TextBox2)
$GroupMembershipMigrationToolForm.Controls.Add($Label1)
$GroupMembershipMigrationToolForm.Controls.Add($MigrateButton)
$GroupMembershipMigrationToolForm.Controls.Add($ClearButton)
$GroupMembershipMigrationToolForm.Controls.Add($CloseButton1)
$GroupMembershipMigrationToolForm.Controls.Add($ResultsLabel)
$GroupMembershipMigrationToolForm.Controls.Add($TextBox1)
$GroupMembershipMigrationToolForm.Controls.Add($DeleteMembersCheckBox)
$GroupMembershipMigrationToolForm.Controls.Add($GroupMembershipMigrationToolLabel)
$GroupMembershipMigrationToolForm.Controls.Add($DestinationGroupLabel)
$GroupMembershipMigrationToolForm.Controls.Add($SourceGroupLabel)
$GroupMembershipMigrationToolForm.Controls.Add($ListBox2)
$GroupMembershipMigrationToolForm.Controls.Add($ListBox1)

#endregion

#region Custom Code

#endregion

#region Event Loop

function Main{
     [System.Windows.Forms.Application]::EnableVisualStyles()
     [System.Windows.Forms.Application]::Run($GroupMembershipMigrationToolForm)
}

#endregion

#endregion

#region Event Handlers


function MigrateButtonMouseClick( $object ){

}

function ClearButtonMouseClick( $object ){

}

function CloseButton1MouseClick( $object ){


}


function UpdateButtonMouseClick( $object ){


    # **** Change the -searchbase entry below to point at the Active Directory OU containing Application Deployment Groups ****
    $Groups = get-adgroup -filter * -searchbase "OU="Application Deployment Groups", OU=Groups, OU=EUC, OU="Thames Water", DC=TWUTIL, DC=NET" | sort Name
    If ($SearchBase -ne "")
    {
    $Groups = get-adgroup -filter * -searchbase $SearchBase | sort Name
        if ($error[0] -gt "")
            {
                #$TextBox2.AppendText("Unable to get AD group list" + "`r`n")
                #$TextBox2.AppendText("Error message " + $Error[0] + "`r`n")
                $error.Clear()
            }
        else
            {
                #$TextBox2.AppendText("Successfully added " + $CompName + " to " + $SelectedGroup + "`r`n") 
                ForEach ($Group in $Groups)
                {
                    ListBox1.Items.Add($Group.Name)
                }
            }


Set-ItemProperty -path HKCU:\Software\GroupMembershipMigrationTool -Name SearchBase -Value $TextBox1.text
    $SearchBase= $TextBox1.Text 
    Try {$Groups = get-adgroup -filter * -searchbase $SearchBase | sort Name}
        Catch
            {
                #$TextBox2.AppendText("Unable to get AD group list" + "`r`n")
                #$TextBox2.AppendText("Error message " + $Error[0] + "`r`n")
                $error.Clear()
            }

        }
}


function Label1Click( $object ){

}


Main # This call must remain below all other event functions

#endregion

SCCM Collection Query for groups

SCCM Collections can have Devices and Users added directly to them, but this doesn’t scale and means that the person adding the Devices or Users needs access to SCCM. It makes much more sense to create a Collection Query that queries an AD group. The following query is used for Devices.

select SMS_R_SYSTEM.ResourceID,SMS_R_SYSTEM.ResourceType,SMS_R_SYSTEM.Name,SMS_R_SYSTEM.SMSUniqueIdentifier,SMS_R_SYSTEM.ResourceDomainORWorkgroup,SMS_R_SYSTEM.Client from SMS_R_System where SMS_R_System.SystemGroupName = "<Domain>\\<AD Group>"

And this one is used for Users.

select
 
SMS_R_USER.ResourceID,SMS_R_USER.ResourceType,SMS_R_USER.Name,SMS_R_USER.UniqueUserName,SMS_R_USER.WindowsNTDomain
from SMS_R_User where SMS_R_User.UserGroupName = "<Domain>\\<AD Group>"

Don’t forget to replace the <Domain> and <AD Group> entries with your own details!

Add a User or Computer to multiple groups using PowerShell

During many deployment or transformation projects, no matter how organised, there is often a requirement to add Users or Computers to application deployment groups during the rollout phase. Often this has to be done at the last minute due to unexpected requirements (or users simply not having responded to requiests for information.

I wrote the following Powershell script to allow Users or Computers to be added to multiple groups. All the groups are expected to be in one OU, and this is set when the script is first run. It will then use that location when opened subsequently. Multiple groups can be selected.

This script requires that the Microsoft RSAT tools are installed on the machine where the script is run.

####################################################################################
# This application lists all available software groups and allows multiple groups to
# be added to a Computer or User
#
# Created by Graham Higginson 13/12/2017
# V1.0
#
####################################################################################

#region  ScriptForm  Designer

#region  Constructor


[void][System.Reflection.Assembly]::LoadWithPartialName("System.Windows.Forms")
[void][System.Reflection.Assembly]::LoadWithPartialName("System.Drawing")

#endregion

#region Post-Constructor Custom Code

#endregion

#region Form Creation
#Warning: It is recommended that changes inside this region be handled using the ScriptForm Designer.
#When working with the ScriptForm designer this region and any changes within may be overwritten.
#~~< Form1 >~~~~~~~~~~~~~~~~~~~~~~~~~~~~~~~~~~~~~~~~~~~~~~~~~~~~~~~~~~~~~~~~~~~~~
$Form1 = New-Object System.Windows.Forms.Form
$Form1.ClientSize = New-Object System.Drawing.Size(904, 704)
#$Form.AutoScroll = $true
#~~< Label4 >~~~~~~~~~~~~~~~~~~~~~~~~~~~~~~~~~~~~~~~~~~~~~~~~~~~~~~~~~~~~~~~~~~~~
$Label4 = New-Object System.Windows.Forms.Label
$Label4.Location = New-Object System.Drawing.Point(24, 642)
$Label4.Size = New-Object System.Drawing.Size(604, 15)
$Label4.TabIndex = 10
$Label4.Text = "Enter AD group location here, e.g. OU=App Groups, OU=Groups, OU=Client, DC=Company, DC=Local "
#~~< TextBox3 >~~~~~~~~~~~~~~~~~~~~~~~~~~~~~~~~~~~~~~~~~~~~~~~~~~~~~~~~~~~~~~~~~~
$TextBox3 = New-Object System.Windows.Forms.TextBox
$TextBox3.Location = New-Object System.Drawing.Point(24, 660)
$TextBox3.Size = New-Object System.Drawing.Size(540, 21)
$TextBox3.TabIndex = 9
$TextBox3.Text = ""
#~~< TextBox2 >~~~~~~~~~~~~~~~~~~~~~~~~~~~~~~~~~~~~~~~~~~~~~~~~~~~~~~~~~~~~~~~~~~
$TextBox2 = New-Object System.Windows.Forms.TextBox
$TextBox2.Location = New-Object System.Drawing.Point(24, 475)
$TextBox2.Multiline = $true
$TextBox2.ScrollBars = "Vertical"
$TextBox2.WordWrap = $false
$TextBox2.Size = New-Object System.Drawing.Size(540, 141)
$TextBox2.TabIndex = 8
$TextBox2.Text = ""
#~~< Label3 >~~~~~~~~~~~~~~~~~~~~~~~~~~~~~~~~~~~~~~~~~~~~~~~~~~~~~~~~~~~~~~~~~~~~
$Label3 = New-Object System.Windows.Forms.Label
$Label3.Font = New-Object System.Drawing.Font("Tahoma", 12.0, [System.Drawing.FontStyle]::Bold, [System.Drawing.GraphicsUnit]::Point, ([System.Byte](0)))
$Label3.Location = New-Object System.Drawing.Point(114, 479)
$Label3.Size = New-Object System.Drawing.Size(277, 23)
$Label3.TabIndex = 8
$Label3.Text = ""
$Label3.TextAlign = [System.Drawing.ContentAlignment]::MiddleCenter
#~~< ListView1 >~~~~~~~~~~~~~~~~~~~~~~~~~~~~~~~~~~~~~~~~~~~~~~~~~~~~~~~~~~~~~~~~~
$ListView1 = New-Object System.Windows.Forms.ListView
$ListView1.Location = New-Object System.Drawing.Point(24, 81)
$ListView1.Size = New-Object System.Drawing.Size(540, 374)
$ListView1.TabIndex = 7
#$ListView1.CheckBoxes = $true
$ListView1.FullRowSelect = $true
$ListView1.Text = "ListView1"
$ListView1.UseCompatibleStateImageBehavior = $false
$ListView1.MultiSelect = $true
$ListView1.View = [System.Windows.Forms.View]::Details
#~~< ColumnHeader1 >~~~~~~~~~~~~~~~~~~~~~~~~~~~~~~~~~~~~~~~~~~~~~~~~~~~~~~~~~~~~~
$ColumnHeader1 = New-Object System.Windows.Forms.ColumnHeader
$ColumnHeader1.Text = "Group Name"
$ColumnHeader1.Width = 400
#~~< ColumnHeader2 >~~~~~~~~~~~~~~~~~~~~~~~~~~~~~~~~~~~~~~~~~~~~~~~~~~~~~~~~~~~~~
#$ColumnHeader2 = New-Object System.Windows.Forms.ColumnHeader
#$ColumnHeader2.Text = "Install State"
#$ColumnHeader2.Width = 100
$ListView1.Columns.AddRange([System.Windows.Forms.ColumnHeader[]](@($ColumnHeader1)))
#~~< Button4 >~~~~~~~~~~~~~~~~~~~~~~~~~~~~~~~~~~~~~~~~~~~~~~~~~~~~~~~~~~~~~~~~~~~
$Button4 = New-Object System.Windows.Forms.Button
$Button4.Font = New-Object System.Drawing.Font("Tahoma", 12.0, [System.Drawing.FontStyle]::Regular, [System.Drawing.GraphicsUnit]::Point, ([System.Byte](0)))
$Button4.Location = New-Object System.Drawing.Point(678, 408)
$Button4.Size = New-Object System.Drawing.Size(120, 47)
$Button4.TabIndex = 6
$Button4.Text = "Close"
$Button4.UseVisualStyleBackColor = $true
$Button4.add_MouseClick({Button4MouseClick($Button4)})
#~~< Button3 >~~~~~~~~~~~~~~~~~~~~~~~~~~~~~~~~~~~~~~~~~~~~~~~~~~~~~~~~~~~~~~~~~~~
$Button3 = New-Object System.Windows.Forms.Button
$Button3.Font = New-Object System.Drawing.Font("Tahoma", 12.0, [System.Drawing.FontStyle]::Regular, [System.Drawing.GraphicsUnit]::Point, ([System.Byte](0)))
$Button3.Location = New-Object System.Drawing.Point(678, 341)
$Button3.Size = New-Object System.Drawing.Size(120, 47)
$Button3.TabIndex = 5
$Button3.Text = "Clear"
$Button3.UseVisualStyleBackColor = $true
$Button3.add_MouseClick({Button3MouseClick($Button3)})
#~~< Button2 >~~~~~~~~~~~~~~~~~~~~~~~~~~~~~~~~~~~~~~~~~~~~~~~~~~~~~~~~~~~~~~~~~~~
$Button2 = New-Object System.Windows.Forms.Button
$Button2.Font = New-Object System.Drawing.Font("Tahoma", 12.0, [System.Drawing.FontStyle]::Regular, [System.Drawing.GraphicsUnit]::Point, ([System.Byte](0)))
$Button2.Location = New-Object System.Drawing.Point(678, 642)
$Button2.Size = New-Object System.Drawing.Size(120, 47)
$Button2.TabIndex = 4
$Button2.Text = "Update"
$Button2.UseVisualStyleBackColor = $true
$Button2.add_MouseClick({Button2MouseClick($Button2)})
#~~< Button1 >~~~~~~~~~~~~~~~~~~~~~~~~~~~~~~~~~~~~~~~~~~~~~~~~~~~~~~~~~~~~~~~~~~~
$Button1 = New-Object System.Windows.Forms.Button
$Button1.Font = New-Object System.Drawing.Font("Tahoma", 12.0, [System.Drawing.FontStyle]::Regular, [System.Drawing.GraphicsUnit]::Point, ([System.Byte](0)))
$Button1.Location = New-Object System.Drawing.Point(678, 196)
$Button1.Size = New-Object System.Drawing.Size(120, 47)
$Button1.TabIndex = 3
$Button1.Text = "Add"
$Button1.UseVisualStyleBackColor = $true
$Button1.add_MouseClick({Button1MouseClick($Button1)})
#~~< Label2 >~~~~~~~~~~~~~~~~~~~~~~~~~~~~~~~~~~~~~~~~~~~~~~~~~~~~~~~~~~~~~~~~~~~~
$Label2 = New-Object System.Windows.Forms.Label
$Label2.Font = New-Object System.Drawing.Font("Tahoma", 9.5, [System.Drawing.FontStyle]::Bold, [System.Drawing.GraphicsUnit]::Point, ([System.Byte](0)))
$Label2.Location = New-Object System.Drawing.Point(663, 81)
$Label2.Size = New-Object System.Drawing.Size(201, 19)
$Label2.TabIndex = 2
$Label2.Text = "Enter computer or User name"
#~~< Label1 >~~~~~~~~~~~~~~~~~~~~~~~~~~~~~~~~~~~~~~~~~~~~~~~~~~~~~~~~~~~~~~~~~~~~
$Label1 = New-Object System.Windows.Forms.Label
$Label1.Font = New-Object System.Drawing.Font("Tahoma", 16.0, [System.Drawing.FontStyle]::Regular, [System.Drawing.GraphicsUnit]::Point, ([System.Byte](0)))
$Label1.Location = New-Object System.Drawing.Point(214, 9)
$Label1.Size = New-Object System.Drawing.Size(446, 32)
$Label1.TabIndex = 1
$Label1.Text = "Multi-group add Tool"
$Label1.add_Click({Label1Click($Label1)})
#~~< TextBox1 >~~~~~~~~~~~~~~~~~~~~~~~~~~~~~~~~~~~~~~~~~~~~~~~~~~~~~~~~~~~~~~~~~~
$TextBox1 = New-Object System.Windows.Forms.TextBox
$TextBox1.Location = New-Object System.Drawing.Point(663, 103)
$TextBox1.Size = New-Object System.Drawing.Size(135, 20)
$TextBox1.TabIndex = 0
$TextBox1.Text = ""
$Form1.Controls.Add($Label4)
$Form1.Controls.Add($TextBox3)
$Form1.Controls.Add($TextBox2)
$Form1.Controls.Add($Label3)
$Form1.Controls.Add($ListView1)
$Form1.Controls.Add($Button4)
$Form1.Controls.Add($Button3)
$Form1.Controls.Add($Button2)
$Form1.Controls.Add($Button1)
$Form1.Controls.Add($Label2)
$Form1.Controls.Add($Label1)
$Form1.Controls.Add($TextBox1)

#endregion

#region Custom Code

#endregion

#region Event Loop

function Main{
	[System.Windows.Forms.Application]::EnableVisualStyles()
    #$Form1.AcceptButton = $Button1
	
    $listView1.Items.Clear()
    
    foreach ($Group in $Groups)
       {
           $Line = New-Object System.Windows.Forms.ListViewItem($Group.Name)
           $ListView1.Items.Add($Line)
       }

    [System.Windows.Forms.Application]::Run($Form1)

}


#endregion

#endregion

#region Event Handlers

function Button1MouseClick( $object )
{
$CompName = "" 
$SelectedGroups = $listView1.SelectedItems.Text 
$Error.Clear()

Try {$Name = Get-ADComputer $TextBox1.Text}
    Catch {}

Try {if ($Error[0] -ne "") {$Name = Get-ADUser $TextBox1.Text -EA}}
    Catch {}


if ($Name -ne "")
   {

   foreach ($SelectedGroup in $SelectedGroups)
    {
        $Error.Clear()
        #Write-Host $SelectedGroup 
        $Members = Get-ADGroupMember -identity $SelectedGroup
        $Identity = get-ADGroup $SelectedGroup
        
        if ($Members.name -notcontains $TextBox1.Text -and $Members.SamAccountName -notcontains $TextBox1.Text)
            {        
        
            $Result = Add-ADGroupMember -identity $Identity.DistinguishedName -members $Name.DistinguishedName 
            if ($error[0] -gt "")
               {
                    $TextBox2.AppendText("Unable to add " + $TextBox1.Text + " to " + $SelectedGroup + "`r`n")
                    $TextBox2.AppendText("Error message " + $Error[0] + "`r`n")
                    $error.Clear()
               }
            else
               {
                    $TextBox2.AppendText("Successfully added " + $TextBox1.Text + " to " + $SelectedGroup + "`r`n")
               }
    }
    else
    {
    $TextBox2.AppendText($TextBox1.Text + " is already a member of " + $SelectedGroup + "`r`n")
    }

   }

   }
   else
   {
   $TextBox2.AppendText("Unable to find device " + $Name + "!!!`r`n")
   } 


}

function Button2MouseClick($object)
{
    Set-ItemProperty -path HKCU:\Software\MultiGroupAddTool -Name SearchBase -Value $TextBox3.text
    $SearchBase= $TextBox3.Text 
    Try {$Groups = get-adgroup -filter * -searchbase $SearchBase | sort Name}
        Catch
            {
                $TextBox2.AppendText("Unable to get AD group list" + "`r`n")
                $TextBox2.AppendText("Error message " + $Error[0] + "`r`n")
                $error.Clear()
            }
    
    $listView1.Items.Clear()
    
    foreach ($Group in $Groups)
       {
           $Line = New-Object System.Windows.Forms.ListViewItem($Group.Name)
           $ListView1.Items.Add($Line)
       }          


}

function Button3MouseClick($object)
{
    #$listView1.Items.Clear()
    $TextBox1.Clear()
    $Label3.Text = ""		
}

function Button4MouseClick($object)
{
   $Groups = ""
   $Form1.Dispose()  
}


function Label1Click( $object ){

}

    #$TextBox2.AppendText("Preparing AD group list..." + "`r`n")

        
    if ((Test-Path -Path HKCU:\Software\MultiGroupAddTool) -eq $false)
        {
        New-Item -path HKCU:\Software\MultiGroupAddTool
        New-ItemProperty -path HKCU:\Software\MultiGroupAddTool -Name SearchBase
        $SearchBase = ""
        }
    else
    {
                $Reg = Get-ItemProperty -path HKCU:\Software\MultiGroupAddTool -Name SearchBase
                $TextBox3.text = $Reg.SearchBase
                $SearchBase = $Reg.SearchBase
    }

    if ($SearchBase -eq "") 
        {
        [System.Windows.MessageBox]::Show("Please add AD group location")
         #Main
        }

    # **** Change the -searchbase entry below to point at the Active Directory OU containing Application Deployment Groups ****
    #$Groups = get-adgroup -filter * -searchbase "OU=Application Catalogue, OU=Software, OU=Groups, OU=Client, DC=Arqiva, DC=Local" | sort Name
    if ($SearchBase -ne "")
    {
    $Groups = get-adgroup -filter * -searchbase $SearchBase | sort Name
        if ($error[0] -gt "")
            {
                $TextBox2.AppendText("Unable to get AD group list" + "`r`n")
                $TextBox2.AppendText("Error message " + $Error[0] + "`r`n")
                $error.Clear()
            }
        else
            {
                #$TextBox2.AppendText("Successfully added " + $CompName + " to " + $SelectedGroup + "`r`n") 
            }
    }


Main #This call must remain below all other event functions

#endregion